This week’s obsession: Marbled Fondant
- rebellionbaking
- Jan 19, 2020
- 4 min read

Have I mentioned to you that I’m a nerd? I know, I’m sure that’s coming as a huge shock because in my writing I present myself as one of the coolest people on the planet. But in all actuality I am a Harry-Potter-obsessing, giggle-at-my-own-terrible-jokes, musical-theater-loving, recite-the-alphabet-backwards-and-in-French-because-I-can, look-at-this-science-stuff-isn’t-it-cool, read-extra-books-outside-of-class (or in my adult life, outside of Book Club) for-funsies type of nerd. I’ll just let that sink in for a minute. And I’ll let you in on a little secret: my man candy is a super nerd, too. I know THAT one you’ll never believe, being that he’s a super athlete and all, but he actually is. So much so that he has kept in contact with his former geology professors from college and met up with them while they were on the island for a class related geology field trip this past week. I have to admit I absolutely love it (his nerdiness thing, not geology)!

Every 2 years, his professors organize a trip to the islands with their geology students to study the volcanic rock formations and other things (there were mentions of alluvial fans, which I absolutely recognize that term from my one geology course from back in the day, but for the life of me I can’t remember what that is), and invited the alumni to join them on this trip. We went out to dinner with just the professors and alumni the first evening they were here, but on the second evening we were invited to an outdoor dinner with all of the students, professors, and alumni. I was pretty pumped because this would be a perfect opportunity to make some sweets for them. I don't know about you, but I had a doozy of a week, so unfortunately by the time the dinner rolled around, I had had zero time to bake cupcakes, much less decorate them. But I did have some really cool plans for this week’s baking, and I just couldn’t get the idea out of my head: I wanted to make geode cupcakes to celebrate the geology theme of the whole trip.

Fortunately, there’s always someone around to eat whatever I bake, so I made these little babies even though I missed my window of opportunity. Most of the geode cupcakes I’ve seen are either carved into the cupcake (like I did for my geode birthday cake) but leaving less cupcake for actual consumption, or the icing has been with marbled fondant, which I think is a pretty cool look, so that’s what I went for.

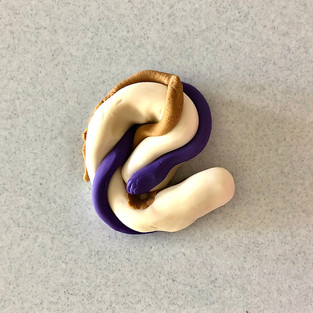
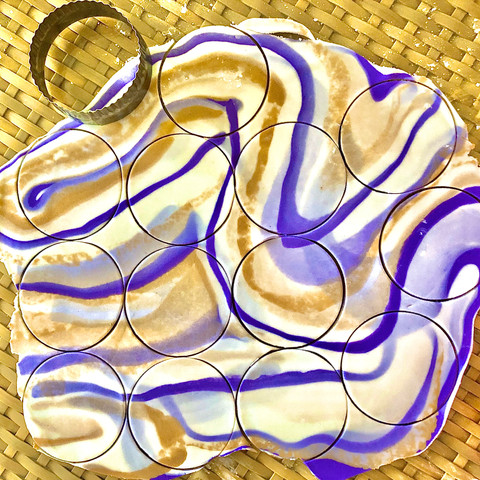
My tip of the week is in regards to this marble fondant technique I used. This was a super fun technique to use for geode base. Because I used this for cupcakes, I used a small amount of white fondant but if you’re going to cover a cake or want a more subtle marbleized look for your fondant, be sure to use plenty of white fondant (I’d suggest double or even triple the amount of white fondant that I used) to minimize the look of the other colors. If you wanted a more authentic marble color, I would suggest using black and off-white or ivory. Clearly I wasn’t too concerned with authenticity because I used purple instead of black, and a goldish color to match (also I threw in green rock candy as a subtle nod to Mardi Gras - not quite as in your face as last week’s king cake but still there).

The first step is to make fondant ropes out of your two (or three) colors. They do not need to be similar in volume, but you do to roll them out to approximately the same lengths, and then twist. (My gold rope broke because it dried out a bit while I was taking photos, but it doesn’t really matter for this technique.)
Fold one end of the rope in on itself one third of the way, then fold the other end of the rope over so that it makes a small blob. Roll your new blob out into one large rope, and fold in thirds into another blob. You can repeat this rope, fold/blob, rope method two or three more times to mix all the colors in, and then roll out your fondant to your desired thickness.
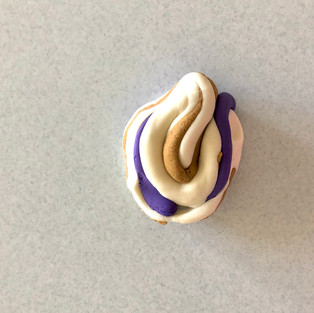

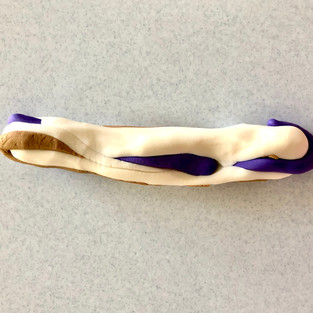
Because I was using this to cover cupcakes, I cut circles out of the fondant, but you can also use this to cover a cake tier.
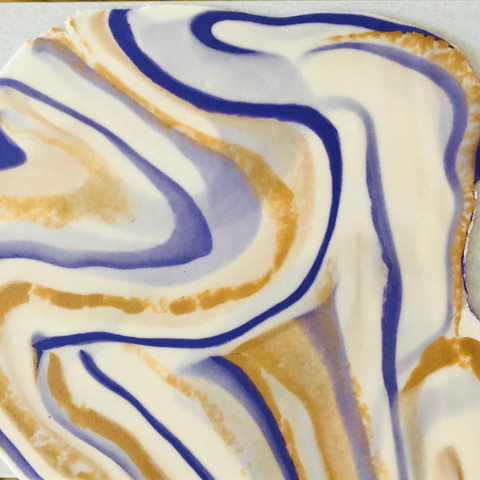
Next I cut a slit down the middle of some of the circles, or cut a crescent shape out, or some abstract design out of the middle and stretched it out over the frosting on my cupcakes (cookie butter frosting on vanilla cupcakes is a definite palate pleaser!), which left a gap in the fondant, causing some of the frosting to remain exposed through the slits and cutouts. I piled the green rock candy on the exposed frosting, surrounded that with the white rock candy, sampled each flavor of candy several times for quality control, then painted a gold edge around the candy formation for a little sophisticated flair.

I’m a little disappointed that the geology professors and students didn’t get to dig into these little works of art, but I am feeding them to my guests, neighbors, and random passers-by on the streets (there are a lot of runners in this area. They call it “nutrition” for their runs ;) so hopefully they will all gain a little geology exposure and a bit of appreciation for the sugary geode formations I’ve provided.

Have questions about this technique, or something else that you’re working on? Don’t hesitate to reach out to me! Either post your comment below, or email me at RebellionBaking@gmail.com.
Happy eating, y’all!
Comments